
Today’s article is about CI/CD pipelines. I’m writting about this as I wanted to step into the worldCI/CD and as I didn’t have previous experience with this, I wanted to write down some steps and instructions on how to get started. The following article is a summary of things I found interesting and also tried around that concept.
Gitlab CI/CD
Continuous Integration (CI):
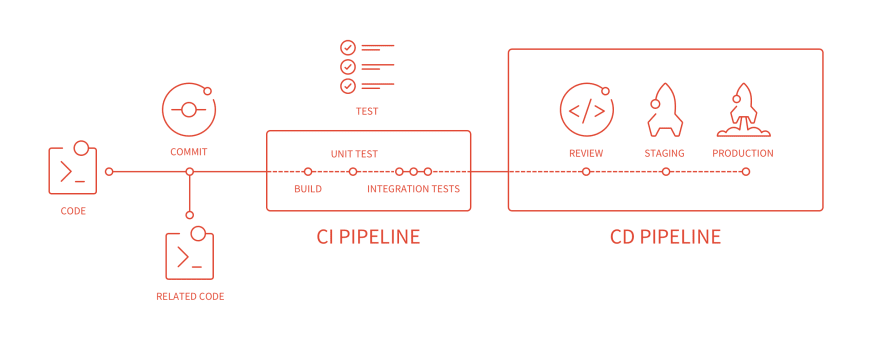
Works to integrate code provided by your team in a shared repository. Developers share the new code in a Merge (Pull) Request or PR. The request triggers a pipeline to build, test, and validate the new code prior to merging the changes within your repository.
Continuous Delivery (CD):
Ensures the delivery of CI validated code to your application by means of a structured deployment pipeline. Deploys the code to your application, code is released to production.
All code is tested throughout each stage, ensuring better quality builds and applications with fewer bugs. CI/CD pipelines can determine what happens when builds pass or fail these tests, meaning that errors are identified much faster. CI and CD accelerate how quickly your team delivers results for your customers and stakeholders.
The two CDs: Continuous Delivery/Continuous Deployment:
Continuous deployment means that all validated code deploys to production automatically, whereas continuous delivery means that this code can be deployed. The flexibility for code to be deployed at any time is what differentiates delivery from deployment, and practicing continuous deployment is possible when continuous delivery is already in place.
An overview of the pipeline:
Why CI/CD?
There are automated processes involved in a CI/CD pipeline, meaning that there will be less manual tasks, fewer errors, teams are more efficient and spend less time putting out fires. An automated workflow also reduces the chance of human error and improves handoffs.
GitLab CI/CD Architecture
GitLab CI/CD is a part of GitLab, a web application with an API that stores its state in a database. It manages projects/builds and provides a user interface, besides all the features of GitLab.
GitLab Runner is an application which processes builds. It can be deployed separately and works with GitLab CI/CD through an API.
To perform the actual build, you need to install GitLab Runner which is written in Go. It has many features, including autoscaling, great Docker support, and the ability to run multiple jobs concurrently.
In GitLab CI/CD, Runners run the code defined in .gitlab-ci.yml. A GitLab Runner is a lightweight, highly-scalable agent that picks up a CI job through the coordinator API of GitLab CI/CD, runs the job, and sends the result back to the GitLab instance. Runners are created by an administrator and are visible in the GitLab UI. Runners can be specific to certain projects or available to all projects.
There are three types of runners (I won’t cover the details of the types now, but you can find more information here):
- Shared (for all projects)
- Group (for all projects in a group)
- Specific (for specific projects)
Below you’ll find the instructions on how to enable a runner on a specific project.
Getting Started with GitLab CI/CD
To start with CI/CD we need to set up a runner. Runners run the code defined in .gitlab-ci.yml. If there is no .gitlab-ci.yml file in your project you won’t be able to complete the seps above. Just click on the Add CI/CD button in your projects gitlab page to create one. Alternativelly, you can create the file manually under your repository’s root directory.
Set Up GitLab Runner on Ubuntu 18.04
Runner are cross-platform, so they can be installed in any OS. Here I follow the GNU/Linux istructions and I install GitLab Runner on an Ubuntu 18.04:
-
Download the latest file
See the latest release here. The one I’m using is the 13.1.1:
curl -LJO https://s3.amazonaws.com/gitlab-runner-downloads/master/deb/gitlab-runner_amd64.deb
-
Install it:
dpkg -i gitlab-runner_amd64.deb -
Register the Runner:
This step requires an account set up and project already on gitlab.
To register the runner, we need to create a specific runner to obtain a token (via GitLab’s interface):
-
Go to the project’s Settings > CI/CD and expand the Runners section (Under Set up a specific Runner manually you’ll find a URL and a registration token)
- Note the URL and token
- Register the Runner by following the next steps:
On your terminal run the command:
sudo gitlab-runner register
You will be prompt with the following:
Please enter the gitlab-ci coordinator URL (e.g. https://gitlab.com/):
https://gitlab.com/
Please enter the gitlab-ci token for this runner:
<token from previous step>
Please enter the gitlab-ci description for this runner:
test-runner
Please enter the gitlab-ci tags for this runner (comma separated):
test-runner-tag

Registering runner... succeeded
runner=<runner-number>
I’m currently on a VM, so for the next one I choose the virtualbox option:
Please enter the executor: docker, docker-ssh, virtualbox, docker+machine, kubernetes, custom, parallels, shell, ssh, docker-ssh+machine:
virtualbox
Please enter the VirtualBox VM (e.g. my-vm):
my_vm_name
Please enter the SSH user (e.g. root):
root
You’ll find the SSH key on GitLab, under User Settings > SSH Keys:
Please enter the SSH password (e.g. docker.io):
<my-ssh-public-key-for-gitlab>
Please enter path to SSH identity file (e.g. /home/user/.ssh/id_rsa):
<my-ssh-file-path>
You should now see the message:
Runner registered successfully. Feel free to start it, but if it's running already the config should be automatically reloaded!
You can also use the following command that includes most of the above:
sudo gitlab-runner register -n \
  --url https://gitlab.com/ \
  --registration-token REGISTRATION_TOKEN \
  --executor shell \
  --description "My Runner"
Next, I enable the Runner for the project. You must have Owner permissions for the project and the specific Runner must not be locked.
To enable or disable a specific Runner for a project:
- Go to the project’s Settings > CI/CD and expand the Runners section
- Click Enable for this project
To prevent a specific Runner from being enabled for other projects you can lock a Runner:
- Go to the project’s Settings > CI/CD and expand the Runners section.
- Find the Runner you want to lock or unlock. Make sure it’s enabled.
- Click the pencil button.
- Check the Lock to current projects option.
- Click Save changes
To see the configured runners on your machine run:
sudo gitlab-runner list
How to write the .gitlab-ci.yml file
Notes:
- Gitlab server will automatically deligate a (shared) GitLab Runner to download a Docker container and image, execute the steps of the process and makes sure it saves any
artifacts(mentioned later) for thejobsto be completed, just by having a.gitlab-ci.ymlfile in the root difrectory of your project. After the process sucesses it deleted the image. If we register a runner to our project, it will run locally instead using docker. - The .gitlab-ci.yml file tells the GitLab Runner what to do. A simple pipeline commonly has three stages:
- build
- test
- deploy
- The pipeline appears under the project’s CI/CD > Pipelines page. If everything runs OK (no non-zero return values), you get a green check mark associated with the commit. Many projects use GitLab’s CI service to run the test suite, so developers get immediate feedback if they broke something.
- Because
.gitlab-ci.ymlis in the repository and is version controlled, old versions still build successfully, forks can easily make use of CI, branches can have different pipelines and jobs, and you have a single source of truth for CI. - On any push to your repository, GitLab will look for the
.gitlab-ci.ymlfile and start jobs on Runners according to the contents of the file, for that commit. .gitlab-ci.ymlis a YAML file so you have to pay extra attention to indentation. Always use spaces, not tabs- The pipeline automatically runs everytime a commit happend (or a change is saved from the gitlab UI).
- We can specify to our runner which Docker image to use that contains all the packages that out code will need to build.
Elements of a .gitlab-ci.yml file
The .gitlab-ci.yml file defines sets of jobs with constraints of how and when they should be run. The jobs are defined as top-level elements with a name (in our case test, run and pages) and always have to contain the script keyword. Jobs are used to create jobs, which are then picked by Runners and executed within the environment of the Runner.
This is the simplest possible configuration:
- Define two jobs
testandrun(the names are arbitrary) with different commands to be executed - Before every job, the commands defined by
before_scriptare executed
If you want to check whether the .gitlab-ci.yml of your project is valid, there is a Lint tool under the page /-/ci/lint of your project namespace. You can also find a CI Lint button to go to this page under CI/CD ➔ Pipelines and Pipelines ➔ Jobs in your project.
stages:
We define the jobs that we want our pipeline to perform. Usually is build and test.
build:
We define what the job build will do, by writing a script with commands underneeth it.
test:
We define what the job test will do, again, by writing a script with commands underneeth it. Usually, a test job tests if the build steps were completed successfully, but we need to define those testing steps. It can also run any tests we have in place in our code.
artifacts
Each job is run independently from each other. Under build we can define artifacts so the jobs can communicate with each other, otherwise any job performed during the build would be discarded before the test job. With the artifact, the jobs knows what to save, like files or folders created during the build stage. They defined by paths.
debugging
If the test job fails we can include debugging commands under the test stage that can print out results from the previous commands so we check what those outputs are at the logs in the gitlab UI for that particular test job.
The following is the template .gitlab-ci.yml file for python:
# This file is a template, and might need editing before it works on your project.
# Official language image. Look for the different tagged releases at:
# https://hub.docker.com/r/library/python/tags/
image: python:latest

# Change pip's cache directory to be inside the project directory since we can
# only cache local items.
variables:
  PIP_CACHE_DIR: "$CI_PROJECT_DIR/.cache/pip"

# Pip's cache doesn't store the python packages
# https://pip.pypa.io/en/stable/reference/pip_install/#caching
#
# If you want to also cache the installed packages, you have to install
# them in a virtualenv and cache it as well.
cache:
  paths:
    - .cache/pip
    - venv/

before_script:
  - python -V               # Print out python version for debugging
  - pip install virtualenv
  - virtualenv venv
  - source venv/bin/activate

test:
  script:
  - python setup.py test
  - pip install tox flake8  # you can also use tox
  - tox -e py36,flake8

run:
  script:
  - python setup.py bdist_wheel
  # an alternative approach is to install and run:
  - pip install dist/*
  # run the command here
  artifacts:
    paths:
    - dist/*.whl

pages:
  script:
  - pip install sphinx sphinx-rtd-theme
  - cd doc ; make html
  - mv build/html/ ../public/
  artifacts:
    paths:
    - public
  only:
  - master
Notes:
- To see the GitLab logs on your marchine:
/var/log/syslog - If you want tthe runner to run everything inside a docker container, then When register a runner choose
dockeras theexecutor
For more information and a complete .gitlab-ci.yml syntax, please read the reference documentation on .gitlab-ci.yml.
Read more on how to get started with GitLab and Kubernetes here.
sources:
- Continuous integration and delivery
- GitLab Continuous Integration (CI) & Continuous Delivery (CD)
- Building Docker images with GitLab CI/CD
- Install GitLab Runner
- Install GitLab Runner manually on GNU/Linux
- Configuring GitLab Runners
- Getting started with GitLab CI/CD
- GitLab CI: Pipelines, CI/CD and DevOps for Beginners